


With this post I will detail and critique the technology which we used throughout the project in a somewhat chronological order.
Research and Planning
Social Media and Web 2.0
 Facebook was vital in the sense that it was a platform for us to organise the project as well as share and document ideas within the group.
Facebook as a communicative tool, was extremely useful. We could upload images in a private group, comment on them and debate the success of each individual shot very easily. Another valuable feature was the group chat, which game with a "seen" function. We could discuss ideas and see see who within the group had seen what content, whether in a chat or an image. This enabled us to keep up to date with who knew about what decisions etc.


YouTube was a useful means of researching other videos, as well as archiving points of reference. We used the playlist function to gather a list of inspirational videos which could end up influencing our project in the future. This allowed everyone within the group to easily access these points of reference and to update it for everyone else to see.


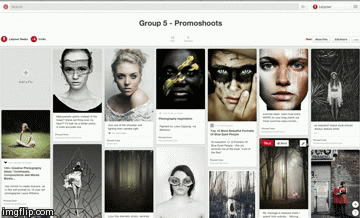
Pinterest was a very useful tool. We collected inspirational photos and images for styles, locations, makeup, costumes, hair and visuals. Then, we would store them (or 'pin' them) on Pinterest so that we could access them whenever we anted to and update the list whenever we wanted. It was really useful for sharing and discussing ideas as well as acting as an archive of previous points of reference.

Google Hangouts was a primary means of real time communication for when we weren't in school. Google Hangout lets you video call in a group as so we used it to discuss ideas develop the project with visual aids shared via our webcams.

Mobile Phones
Our phones were our primary source of communication with each other. We had all the previously mentioned apps on our phones in addition to the obvious features of messages and calls. Therefore, our phones were out go to piece of technology for organising meetings, screenings and quickly discussing aspects of the project.
We also used our phones as a means of capturing evidence in the form of photos and videos. We could then store them on our phone and share them via the aforementioned social apps. Due to the lack of setup timer and ease of access, we used our phones for filming a few spontaneous test shoots here and there. Below are a few examples of evidence captured from our phones:

Construction - Production
Canon 5D MKII
Our designated camera for the project was the Canon 5D MKII. We used to it to record studio footage because of it's high quality recording ability and professional industry standard. It was very much HD, recording in 1920 x 1080p with a 16:9 aspect ratio. It also allowed us to change settings such as ISO, exposure and zoom, which was vital for capturing an authentic looking infinity code background.

Leapfrog Lighting Desk
The school's studio has a Leapfrog Lighting Desk that allows us to create a very professional look as seen in our video. Numerous Arri 1000K Lights are at the control of the Leapfrog Lighting Desk. The Desk can alter the angle, intensity and target radius of each light.
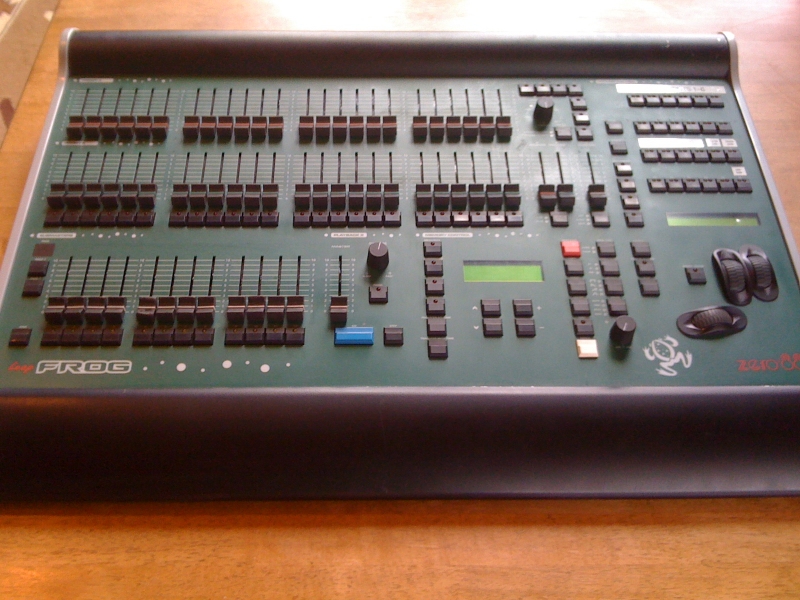
One problem we had with the lighting was having to re-position the rigs before every studio session. As we were sharing the studio with other groups, we had to move the lights before each shoot, as different groups had different lighting set ups. This meant a lot of time was wasted, however this was unavoidable. The desk did prove useful for this instance though as it allowed us to save lighting colour setups, cutting the time wastage.
Mobile Phones
Mobile phones were an essential part of the evidencing process, as they were the most convenient and accessible tool at our disposal. We also used them as a means of documenting shoot boards and shoot schedules which was a great way of staying organised both in and out of school at all times.
| We were then able to send saved photos and files to one another's phone |
Construction - Post Production
Adobe Photoshop
Adobe Photoshop was our go to application when it came to the design of the album cover. It gave us the ability to deal with multiple layers and the necessary tools to compose the images in a professional manner.

The merged face graphic was a challenge to create. It was very complex in the sense that there were multiple images layered upon one another. We had to use a clipping mask to then cut out sections for certain layers in order to slot them into the necessary position. We eventually managed to produce a sleek graphic that we were proud of.


Photoshop became extremely useful when it came to editing the many promotional shots that we had taken, both on and off site. There were a few small tasks that had to be completed on each shot, such as editing out the line where the curtain hit the floor and removing shadows on the backdrop. Below is quick example of some of the minor tasks that needed to be done:
Because the shots were taken in different matches across many different shoot days, the lighting setups where never going to be completely the same. Therefore, on the odd occasions we'd have to adjust settings such a brightness, contrast and saturation in order to get each shot looking consistent with one another.

Difference between full colour (unedited) and monochrome (edited)
Photoshop was also the platform that we used for creating the merchandise of our store. It was a simple process. We'd take plain coloured piece of merchandise from a real retailer website and simply superimpose the logo onto said item of merchandise, essentially branding in NTLS.


Adobe Illustrator
The NTLS logo was first drawn by hand, but we needed to translate that drawing into a digital file. We used Adobe Illustrator to trace the image of the scanned in drawing and make it presentable as a digital file.

To edit our footage we used Adobe Premiere Pro. It allowed us to edit the footage in layers and edit in any order we saw fit.
 |
| Timeline for edit |
On top of the standard editing techniques used for the timeline, we used some of the editing tools to alter the framing or speed of shots. Where shots were too wide, we cropped the image by using the scale tool to increase the zoom, then the positioning tool to change its position in the frame. If a shot was too fast, we slowed it down using the speed duration tool.


Adobe After Effects
We did not originally intend to have to grade in Adobe After Effects but because of problems that arose with our footage we were forced to in the end. Some shots in our music video were too over exposed and the editing software within Adobe Premiere Pro did not allow us to correct it. To fix this problem, we had to open said shots in After Effects, which allowed us to isolate specific colours, which wasn't difficult luckily.
Within After Effects, we utilised a plugin called Color Finesse 3

The interface for Colour Finesse was a lot more complex than ProcAmp or Threeway-Colour-Corrector, but it didn't take long to learn how to use, as the principals of using sliders to change certain aspects of the image were the same.


We downloaded Honestech as a means to capture the footage from the VHS camera. Because of the nature and age of the camera, this external software was not already present on our editing suite as the school could never have predicted we would have needed it. The software was were simple and easy to use, allowing us to format the VHS footage into one that could be edited into the final cut of our music video.
The VHS camera itself was also very easy to use but due to the fact we were recording footage on analogue we had to be careful not to film over any previously captured footage. Unfortunately, the camera was quite old and as a result, fairly battered as well. Consequently the battery life wasn't as strong as it was meant to be.
Two major hindrances with the VHS camera is that it shot in 4:3 and not 16:9 as well as the fact that it automatically left a watermark of the date on the footage, which could not be removed. However, we were able to crop the frame dimensions in post production, thus rectifying the problems.


The black bars and box around the images are a result of the VHS filming in 4:3

An example of the video watermark showing the date we filmed the footage
Social Media and Web 2.0
We thought it necessary to integrate various social media links within our website in order to increase the level on interactivity the audience had to toy with. We created a Facebook Page, a Twitter page and an Instagram page. We uploaded as often as possible on each one to achieve an authentic feel and made sure to post images and details about upcoming moments of interest. In addition, we harnessed some synergy between the social media sites themselves; for example, posting links to our newly uploaded Instagram photos, on Twitter.
Evaluation
Social Media and Web 2.0
Collecting tick box and written responses from a wide range of anonymous people wouldn't have been possible without SurveyMonkey. The website allows you to create surveys that are very easy to give feedback on, even for those technically lacking on computers. The fact that it was anonymous meant that more people would be willing to participate and that those involved wouldn't feel pressured into giving us overly positive feedback. We were able to ask both qualitative and quantitative questions in order to receive the most in depth date possible.


Once we had created the surveys, we all posted the links to survey onto our Facebook walls, where each of us has at least 500 friends, leading to a somewhat guaranteed reach of 200 people each.

Mobile Phones
Although a more minor role, we used our mobile phones to record interviews / audience feedback and then would later upload it to either SoundCloud or YouTube.

No comments:
Post a Comment